
Adding One or More Animal Foster Record(s) for an Existing PCO
1.On the TTR Home screen, click the People, Companies, Organizations button to launch the Manage People, Companies, and Organizations screen.
2.Use one of these methods to select the PCO who will foster the animal(s):
OR
– In the Show field to the left of the center grid, select People or Companies and Organizations, and then in the Last Name field above the center grid, begin typing the letters of the PCO’s last name or organization name until the only item appearing in the center grid is the desired PCO, indicating it is selected because the row is highlighted and has an arrow in the leftmost cell.

3.With the desired PCO selected, click the Foster an Animal button to the right of the center grid under Animal Transactions to open the Foster an Animal(s) screen.
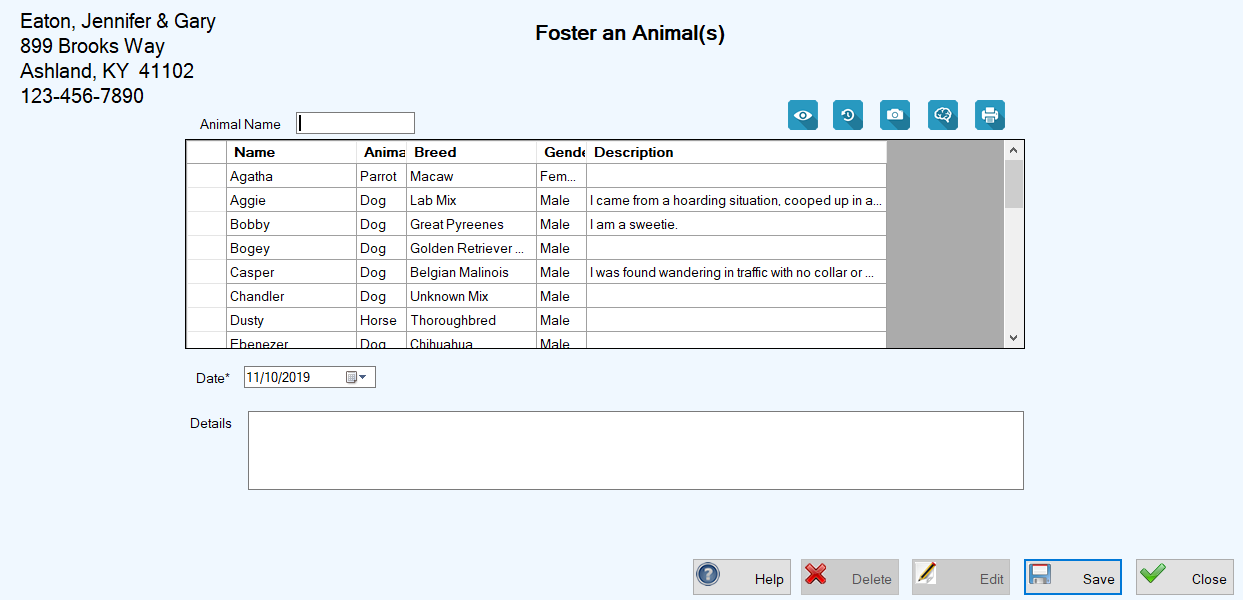
4.Use one of these methods to select the animal(s) being fostered:
|
TO SELECT
|
DO THIS
|
|
Multiple animals adjacent to each other in the center grid
|
Use the vertical scroll bar on the right to move down the grid until you find the desired animals, then click the cell to the left of the uppermost animal you want to select, hold down the Shift key on your keyboard, and click the cell to the left of the bottommost animal you want to select.
|
|
Multiple animals not adjacent to each other in the center grid
|
Use the vertical scroll bar on the right to move down the grid until you find the first desired animal. Click the leftmost cell on the row containing the animal’s information, then hold down the Ctrl key on your keyboard and scroll down to find the next desired animal and click the leftmost cell on that row. Repeat this process until you have selected (highlighted) the rows containing all desired animals.
|
5.In the Date field, which defaults to today’s date, if the fostering began before today, enter or select the date. Otherwise, leave the date as it is. Note: The system will not accept a future date in this field.
6.In the optional Details field, enter any helpful information about this fostering situation for future reference.

7.Click Save. You are returned to the Manage People, Companies, and Organizations screen, where the PCO is still selected in the center grid and a confirmation message appears in the lower left corner. You can further confirm the foster record by clicking the blue History button ( ) above the center grid to view the PCO History screen.

Editing a Foster Record Using the PCO Screen
1.Select the desired PCO by performing Steps 1 and 2 above for Adding Foster Records.
2. With the desired PCO selected, click the blue History button () at the top right above the center grid. The PCO History screen appears, showing all recorded transactions for the selected PCO. (See screen image in Step 7 above.)
3.Select the Foster transaction you wish to edit by double-clicking the leftmost cell on the row containing the foster information. The Foster screen opens, showing all the editable information, ready for your changes.

4.Enter your desired changes and click Save. You are returned to the PCO History screen, where your changes appear in the center grid, along with a confirmation message in the lower left corner of the screen.
Deleting a Foster Record Using the PCO Screen
1.Perform Steps 1 and 2 for Editing a Foster Record Using the PCO Screen.
2.Select the Foster transaction you wish to delete by clicking the leftmost cell on the row containing the foster information.
3.Click the Delete button. A confirmation popup appears:

4.To complete the deletion, click OK. You are returned to the PCO History screen, where the Foster transacton no longer appears in the center grid, and an “Foster deleted” confirmation message appears in the lower left corner of the screen.