
Establishing an Existing PCO as a Volunteer
1.On the TTR Home screen under Modules, click the People, Companies, Organizations button to open the Manage People, Companies, and Organizations screen.
2.Use one of these methods to select the PCO you want to connect to an event:
OR
– In the Show field to the left of the center grid, select People or Companies and Organizations, and then in the Last Name field above the center grid, begin typing the letters of the PCO’s last name or organization name until the only item appearing in the center grid is the desired PCO, indicating it is selected because the row is highlighted and has an arrow in the leftmost cell.
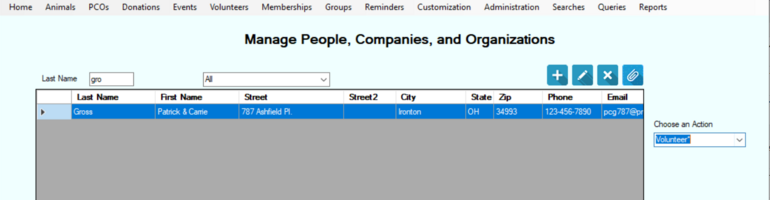
3.With the desired PCO selected, click the Volunteer button to the right of the center grid near the top to open the Volunteer screen.
4.In the Assignments field, click the checkboxes beside all Assignments for which the PCO has agreed to volunteer, including any Animal Types for which the PCO has expressed a preference. (Note: In the instructions for Creating & Managing Volunteer Activities, we recommend including some or all of your Animal Types so you will be able to specify the type(s) of animals with which each volunteer prefers to work.) Use the scroll bar on the right side of the field to navigate through the Assignments list.
5.In the Active/Inactive field, leave the setting at Active.
6.The Date Active field defaults to today’s date. If the date the PCO became a volunteer is different, type in or use the Date Picker to select the date.
7.In the optional Notes field, enter all helpful information about the volunteer, including days and hours available, special preferences and talents, etc. Your screen will now look something like this:
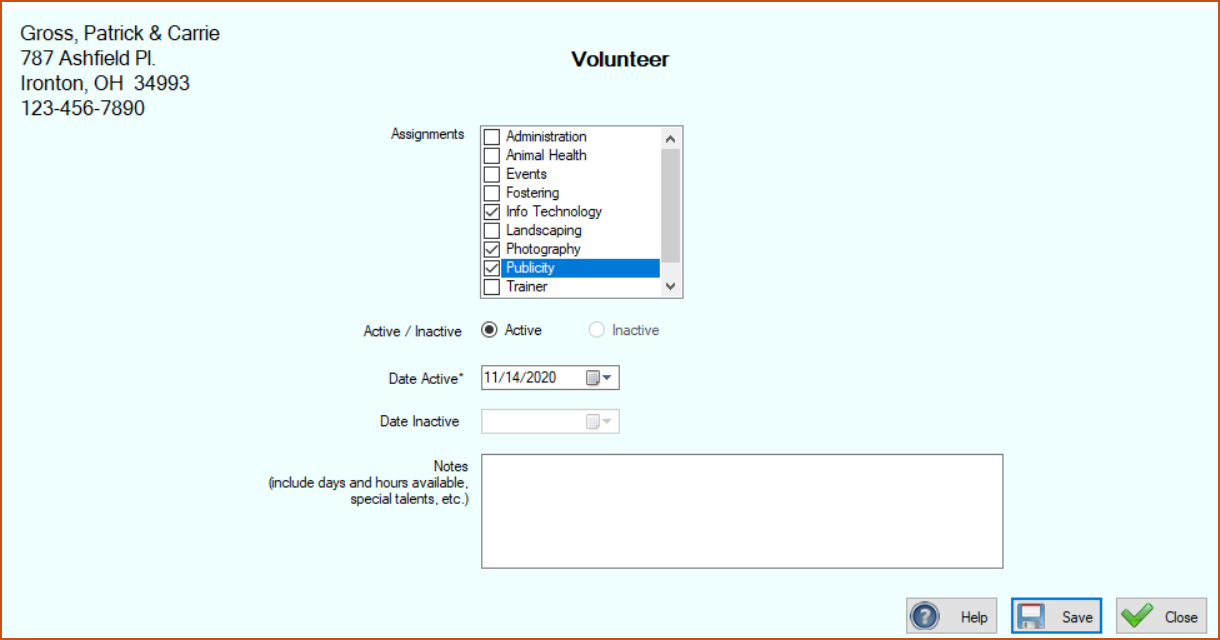
8.Click the Save button. You are returned to the Manage People, Companies, and Organizations screen where the PCO is still selected and a confirmation message appears in the lower left corner of the screen.
Editing a PCO’s Volunteer Assignments
1.Follow Steps 1 through 3 above for Establishing an Existing PCO as a Volunteer.
2.In the Assignments field, select and/or deselect Assignments as needed.
3.Leave the Active/Inactive and Date Active fields as they are.
4.Add any relevant notes in the Notes field. (Note: The Notes field doesn’t show the date you entered the note, so you might want to preface your notes with the date of entry.)
5.Click Save. You are returned to the Manage People, Companies, and Organizations screen, where the PCO is still selected and a confirmation message appears in the lower left corner.
Changing a Volunteer’s Status
1.Follow Steps 1 through 3 above for Establishing an Existing PCO as a Volunteer.
2.In the Active/Inactive field, select the desired status.
3.Add any helpful information in the Notes field.
4.Click Save. You are returned to the Manage People, Companies, and Organizations screen, where the PCO is still selected and a confirmation message appears in the lower left corner.